
By the end of class Wednesday, November 14, 2012, complete the following:
1. Create a new page titled Veggie Face.
2. Put related images on the top bar.
3. Drag down three photogalleries. Make them 4 columns.
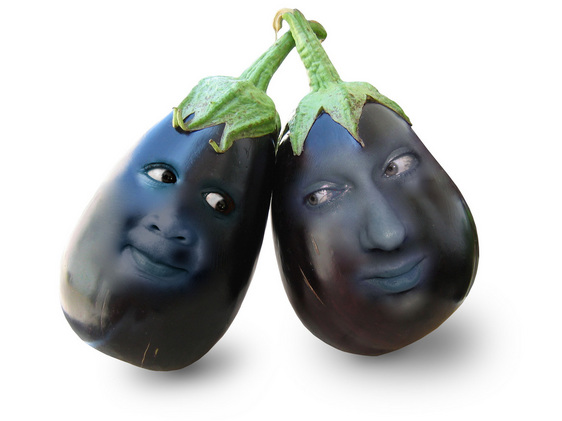
4. Complete one veggie face project and post the components as shown above
(original images, final result, and labels).
I will be grading this portion Wednesday evening. Be sure you have ALL of this completed.
1. Create a new page titled Veggie Face.
2. Put related images on the top bar.
3. Drag down three photogalleries. Make them 4 columns.
4. Complete one veggie face project and post the components as shown above
(original images, final result, and labels).
I will be grading this portion Wednesday evening. Be sure you have ALL of this completed.
making food creepy...
You can choose any type of food so long as the surface is simple enough to merge
with human facial features.
Here's how you will proceed:
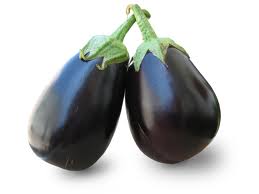
1. Choose a LARGE image of a fruit or vegetable.
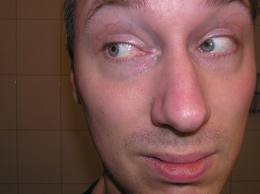
2. Choose a LARGE image of a face.
3. Use the lasso tool to cut out the area around the eye of your face. Make sure that you include enough skin around the eye so that you can blend it with the fruit.
4. Drag the selection over to the fruit image. Place it where it needs to be. You might need to rotate or resize the eye.
5. Make sure you are on the layer with the eye. Go to Image>adjustments>replace color to change the color of the facial feature so that it matches the color of the fruit. You might need to mess with the saturation and lightness as well.
6. Use the dodge, burn, and sponge tool to match shadows and highlights of your fruit layer to the eye layer. You might need to make changes to both layers so toggle between the two.
7. Once the layers are as matched as possible, go to layer>merge visible to merge the two layers. This makes them one layer so that you can blend them together.
8. Use the spot healing tool to blend the layers together. At the top of your screen, make sure that "create texture" is checked...not "proximity match." Look at the hardness of your brush. Bring it down to a softer brush for a less "harsh" effect. Be sure not to grab any of the feature so that it doesn't become blurred as well.
Repeat with all of the facial features.
You will be held accountable for completing THREE veggie faces. Extra work=extra credit...so complete more to get more points. These three veggie faces are due by the end of class Friday, November 16, 2012. When you go to turn in this project, make sure you have completed the following:
1. Your work is posted on a new page titled Veggie Face
2. The top bar of this page has related images.
3. You have three completed Veggie Faces...each posted in a separate 4 column photogallery with the original face and the original fruit.
4. Each photo (original and final images) should have a label.
5. Each Veggie Face looks believable. The features on each face should not be blurred. The colors should match.
This is how you will be graded.
with human facial features.
Here's how you will proceed:
1. Choose a LARGE image of a fruit or vegetable.
2. Choose a LARGE image of a face.
3. Use the lasso tool to cut out the area around the eye of your face. Make sure that you include enough skin around the eye so that you can blend it with the fruit.
4. Drag the selection over to the fruit image. Place it where it needs to be. You might need to rotate or resize the eye.
5. Make sure you are on the layer with the eye. Go to Image>adjustments>replace color to change the color of the facial feature so that it matches the color of the fruit. You might need to mess with the saturation and lightness as well.
6. Use the dodge, burn, and sponge tool to match shadows and highlights of your fruit layer to the eye layer. You might need to make changes to both layers so toggle between the two.
7. Once the layers are as matched as possible, go to layer>merge visible to merge the two layers. This makes them one layer so that you can blend them together.
8. Use the spot healing tool to blend the layers together. At the top of your screen, make sure that "create texture" is checked...not "proximity match." Look at the hardness of your brush. Bring it down to a softer brush for a less "harsh" effect. Be sure not to grab any of the feature so that it doesn't become blurred as well.
Repeat with all of the facial features.
You will be held accountable for completing THREE veggie faces. Extra work=extra credit...so complete more to get more points. These three veggie faces are due by the end of class Friday, November 16, 2012. When you go to turn in this project, make sure you have completed the following:
1. Your work is posted on a new page titled Veggie Face
2. The top bar of this page has related images.
3. You have three completed Veggie Faces...each posted in a separate 4 column photogallery with the original face and the original fruit.
4. Each photo (original and final images) should have a label.
5. Each Veggie Face looks believable. The features on each face should not be blurred. The colors should match.
This is how you will be graded.
