this technique is not to be used for malicious purposes.
seriously...it's just supposed to be funny.
For this project, you are going to create AT LEAST 3 different Paparazzi shots. These are due at the end of class on Friday, December 14, 2012.
Make sure you have completed the following:
1. 3 paparazzi shots are on a new page titled PAPARAZZI.
2. Top bar has related images.
3. You have 3 SEPARATE photogalleries.
4. EACH image is labeled as they are above (names of the two people morphed and a Headline for the final image).
Choose LARGE images. This is CRUCIAL to the believability of your work. Also, your faces should be pointing in the same direction. DON'T choose a profile of Michael Jackson to morph with a front view of Oprah. IT'S NOT GOING TO WORK!
Below, I'm going to show you ONE way to do this.
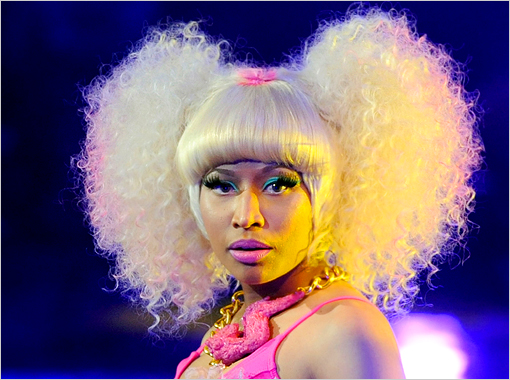
1. Choose two images of people facing the same direction. Open them BOTH up in PhotoShop.
For this project, you are going to create AT LEAST 3 different Paparazzi shots. These are due at the end of class on Friday, December 14, 2012.
Make sure you have completed the following:
1. 3 paparazzi shots are on a new page titled PAPARAZZI.
2. Top bar has related images.
3. You have 3 SEPARATE photogalleries.
4. EACH image is labeled as they are above (names of the two people morphed and a Headline for the final image).
Choose LARGE images. This is CRUCIAL to the believability of your work. Also, your faces should be pointing in the same direction. DON'T choose a profile of Michael Jackson to morph with a front view of Oprah. IT'S NOT GOING TO WORK!
Below, I'm going to show you ONE way to do this.
1. Choose two images of people facing the same direction. Open them BOTH up in PhotoShop.

|

|
2. Use the lasso tool, pen tool, or eraser to select most of the first person's face. It is important that you leave SKIN so that you can morph the two people together later.

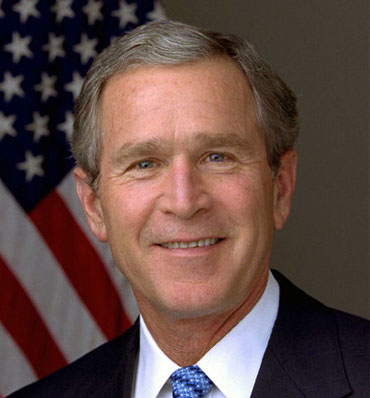
2. Drag the other person(BUSH) onto this file. Make sure that the layer is UNDERNEATH this person(MINAJ).
3. Use Edit>Transform>Scale to make the other person's face peek out of this opening. Be sure to hold the SHIFT key so that the proportions stay the same.
4. You also might need to rotate the image so that the heads are tilting the same.
3. Use Edit>Transform>Scale to make the other person's face peek out of this opening. Be sure to hold the SHIFT key so that the proportions stay the same.
4. You also might need to rotate the image so that the heads are tilting the same.

4. Change the color of the skin of BOTH people so that they match each other. You will have to toggle between layers and choose from a variety of functions to accomplish this:
Hue and Saturation
Replace Color
Color Balance
5. Use the Dodge tool and Burn tool IF NECESSARY to further match the shadows and highlights.
Hue and Saturation
Replace Color
Color Balance
5. Use the Dodge tool and Burn tool IF NECESSARY to further match the shadows and highlights.

6. Once satisfied, go to Layers> Merge Visible to merge the two layers together.
7. Use the Spot healing Brush and the Patch Tool to "moosh" the two people together. Be sure to use a TINY brush in areas that are close to hair, the edges of the face, eyebrows, and facial features.
7. Use the Spot healing Brush and the Patch Tool to "moosh" the two people together. Be sure to use a TINY brush in areas that are close to hair, the edges of the face, eyebrows, and facial features.

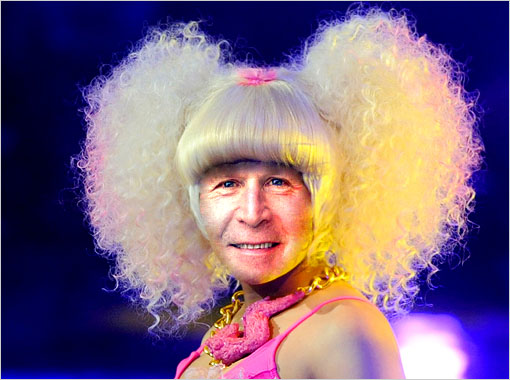
8. Look at the highlight on his/her face. The yellow light doesn't seem to hit the face right where Bush's face comes in. I'm going to use the Patch Tool to bring some of that yellow in farther.

9. Now use the Burn tool to bring back some of the intensity of the shadows on the face. Use the Sponge Tool to Saturate parts oft he face (make them brighter).

"President Bush Belts It On Broadway!"
10. Add a catchy Headline and post it with the originals on your WEEBLY page.
