So let's get serious. This assignment will be part of your final.
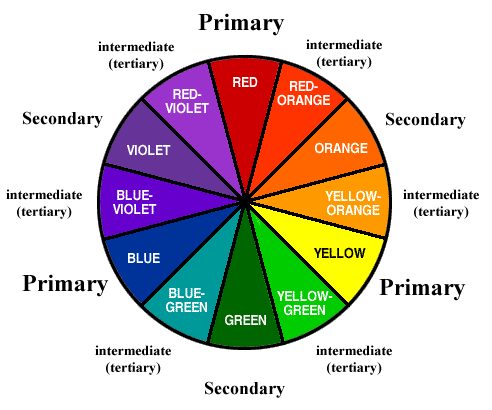
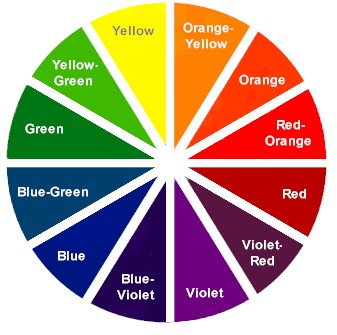
We will be creating a gradient of photos that cover the whole spectrum of color. In pigment (paint, crayons, oil pastels, etc), you can create EVERY color in the rainbow using only the primary colors-- RED, YELLOW, and BLUE. When these colors are mixed together in different quantities, secondary and tertiary colors are created.
Primary- Red, Yellow, Blue
Secondary- Orange, Green, Violet
Tertiary- Red Orange, Yellow Orange, Yellow Green, Blue Green, Blue Violet, Red Violet
In photoshop, we will be tweaking RED, YELLOW, and BLUE photographs to create the secondary and tertiary colors. Here's the first part of the exam you will need to complete:
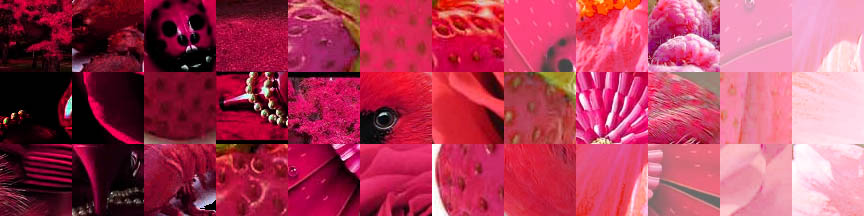
1. Take 10 photographs of RED somethings. These should be close up photos so use either your zoom or macro function on your camera.
2. Take 10 photographs of YELLOW somethings. Again, these should be close up.
3. Take 10 photographs of BLUE somethings. These should be close up photos.
4. Post these on a new page titled GRADIENT by the end of class on TBD . You can have other colors within the photographs as long as they are MOSTLY RED or MOSTLY YELLOW or MOSTLY BLUE. You will use these photographs to create your photo collage gradient by tweaking the colors. We will go over the logistics in class soon.
There are a few things you will be graded on:
1. Your color accuracy
2. Your layer labels
3. Your color order
4. NO WHITE SPACE in between the squares
5. Your effort (each square should be different with a unique composition)
Primary- Red, Yellow, Blue
Secondary- Orange, Green, Violet
Tertiary- Red Orange, Yellow Orange, Yellow Green, Blue Green, Blue Violet, Red Violet
In photoshop, we will be tweaking RED, YELLOW, and BLUE photographs to create the secondary and tertiary colors. Here's the first part of the exam you will need to complete:
1. Take 10 photographs of RED somethings. These should be close up photos so use either your zoom or macro function on your camera.
2. Take 10 photographs of YELLOW somethings. Again, these should be close up.
3. Take 10 photographs of BLUE somethings. These should be close up photos.
4. Post these on a new page titled GRADIENT by the end of class on TBD . You can have other colors within the photographs as long as they are MOSTLY RED or MOSTLY YELLOW or MOSTLY BLUE. You will use these photographs to create your photo collage gradient by tweaking the colors. We will go over the logistics in class soon.
There are a few things you will be graded on:
1. Your color accuracy
2. Your layer labels
3. Your color order
4. NO WHITE SPACE in between the squares
5. Your effort (each square should be different with a unique composition)
| gradientinfosheet.doc |

Extra Credit!
For extra credit (up to 60 pts to be applied to any low score), create a value scale gradient using one of the TERTIARY COLORS. A value scale is one color that goes from dark to light.
Create a new document that is one of these sizes:
12inches x 1 inch (one row)= 10 pts
12inches x 2 inches (two rows)= 20 pts
12inches x 3 inches (three rows)= 30 pts
12inches x 4 inches (four rows)=40 pts
12inches x 5 inches(five rows)=50 pts
12inches x 6 inches (six rows)= 60 pts
You can start with a lower number and add rows if you have time...ask me how!
Select dark and light areas of your 10 10 10 photographs to create a gradient that goes from dark to light in 12 steps! You can use the Exposure function(Image>Adjustments>Exposure) to make your selections slightly darker or lighter.
Make sure you have a clean transition from dark to light.
Make sure you have no white space.
Make sure that each square is unique! NO REPEATS!
Save your work and post it to your weebly site on a new page titled EXAM.